How I Carve a Spoon
Part 2
In this week’s installment of the spoon carving picture narrative, we will look at the tools and methods I use to transform the initial chunky wooden block into a spoon with some sex appeal. Remember it’s all about curves, and a successful transition between the thick and thin parts is what makes the spoon interesting to both eye and hand.
 |
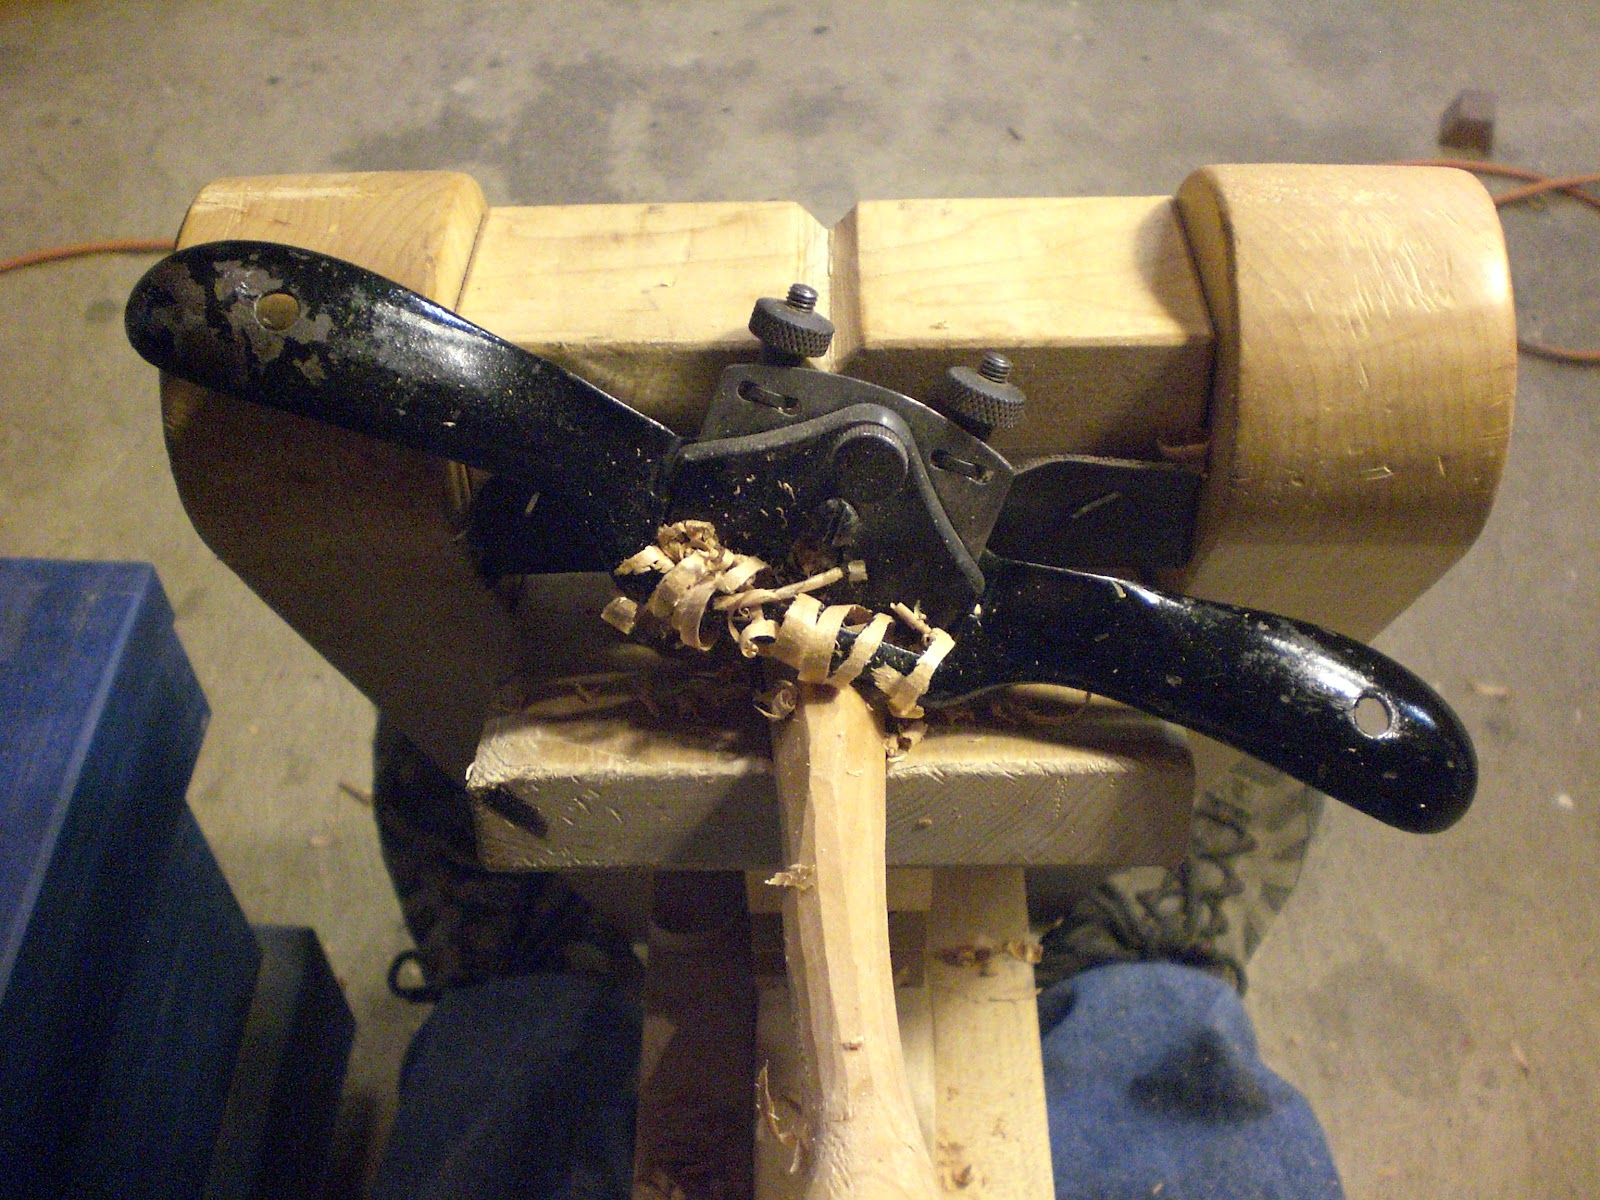
| The drawknife is my weapon of choice when tackling the faceted edges left by the bandsaw. |
 |
| The drawknife is an amazing tool in that it will make course or fine shavings based on the blades angle of attack. Most tools need a manual adjustment to change cutting depth, but a drawknife can quickly be adjusted by the turn of your wrist. The drawknife will take a heavy cut relative to the blade angle, so holding the blade parallel to the work takes a smooth finish cut; while a higher angle takes a course cut. It's all in how you hold the tool. |
 |
| Ribbons of wood shavings left by the drawknife they will be cut off when the spoon is turned around in the shavehorse and removed from the other side. |
 |
| A spoon roughed out with the drawknife. A more finished surface can be achieved with the drawknife alone, but at this point I like to switch to a spokeshave. |
There are a couple of points I would like to make about the next set of tools used in the spoon making process. The first is to give credit to the woodworker who developed and refined the tools that I use, and the second point is to express the value of good tools. One woodworker I feel the need to credit for this segment is chair maker Brian Boggs and here is why. The spokeshave and the shavehorse redesigned by Boggs have actually taught me how to be a better woodworker and make the shapes of my spoons possible. No one taught me how to make spoons or woodworking; it's just something I wanted to do and started making it happen. I consider these two tools in combination as my teachers.
 |
| Brian Boggs style shavehorse− this one was homebuilt by me. FYI The red line on the floor is the toe line for playing darts. Sometimes the shop doubles as the party barn. Not often but sometimes it still does. |
 |
| Brian Boggs spokeshaves available from Lie-Nielsen (bottom), Stanley spokeshave (top). The spokeshave on the bottom has its cutting iron removed and the black lines on the handle were added by me to distinguish the flat bottom spokeshave from the curved bottom spokeshave. Otherwise, they look identical. The lines make it easy to identify when switching between multiple tools. |
Most mentions of spokeshaves that I have read about in woodworking magazines refer to the spokeshave as an unloved and neglected tool, which the authors try to remedy with demos showing the tool in applications that the tool is not really good for. This is a tool that I use every day in ways that no other tool could match. And, in my experience there are a couple of reasons that this tool is so misunderstood. First of all, most spookeshaves aren't that good. Secondly, it’s not a flush cut router or a compass plane. Even though the spokeshave has a wide 2" blade, it doesn't like making wide 2" cuts like a hand plane would. Its best at taking off corners and rounding over the edges of square stock one narrow 1/8" cut at a time. Think of rounding and shaping a chair spindle vs. cleaning up a 1" inside or outside curve.
 |
| Wood ribbons made with a Stanley 151 spokeshave. I modified this flat bottom to a round bottom tool with a belt sander. The round bottom makes it easer to smooth a tight radius. In most cases I reserve the Lie-Nielsen's for finish work. |
I learned how to use a spokeshave through trial and error using my vintage Stanley and a tail vise as a work clamp; it was more trying and erring than successes. The old Stanley spokeshave that I picked up at a flea-market didn't do any more than chatter on wood leaving a surface so chewed up that I could have done a better job cutting wood with own teeth. The other problem is that using a vice to hold the work doesn't allow for rapid changes in repositioning the work and won't adequately secure the work for most angles of attack by a spokeshave. Quick positioning and repositioning of work is essential when working with a spokeshave, because like mentioned earlier, it shapes wood effectively removing a little bit of material with fast strokes vs. removing a course amount of material in a heavy cut.
 |
| A rasp is great for working the neck and rounding the bowl back even if it’s a cheep hardware store variety. Hopefully some nice Auriou rasps are in my future−but even though I love great tools, I am still a tight wad on a limited budget. |
Frustrated, I almost gave up using hand tools to make my spoons, then, I bought two Boggs style spokeshaves and built a Boggs style shavehorse. Eureka! These two perfect mates united for a love fest of success. These Lei-Nielsen tools are so perfect that they are forgiving of my inexperience and rewarding when I do things right. And, the shavehorse, with its foot clamp technology, held the work tight yet release quickly for rapid repositioning of the work. I don't spend a lot of time in any one area, as with any sculpting process, the sculptor needs to move around the work. All the parts need to be worked equally. I won't allow myself to get hung up on any one area, because at this point I'm still roughing out the form. After learning from my Boggs style spokeshaves, I was able revisit my old flea-market find, and now know how to use it successfully. It's great for course work, and inexpensive enough that I didn't think twice about rounding the bottom, so the tool could cut a much tighter radius. Let the moral of this story be that great tools in the right applications will teach success.